Compact Indoor Herb Box: Step-by-Step Setup, Variations, and Troubleshooting
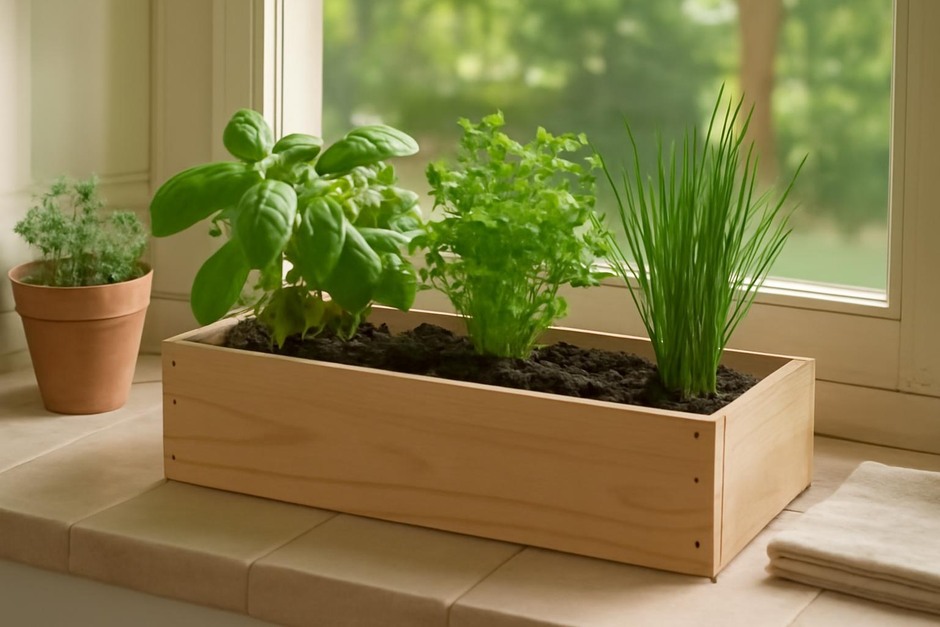
Growing a small herb box on a windowsill is one of the simplest ways to have fresh flavors at hand. This guide presents a calm checklist-style method, highlights common mistakes and corrections, and offers variations and troubleshooting to keep your herbs thriving.
Step-by-step setup
-
Choose the right spot.
Pick a windowsill with at least 4–6 hours of direct light for Mediterranean herbs (basil, rosemary, thyme) or bright indirect light for softer herbs (parsley, chervil). Common mistake: placing the box in dim corners. Correction: rotate the box weekly or use a small grow light for low-light kitchens.
-
Select a container and drainage.
Use a shallow box or long planter 6–8 in deep. Ensure drainage holes or layer stones at the bottom. Common mistake: no drainage leading to root rot. Correction: drill holes or add a thin gravel layer and avoid overwatering.
-
Pick the right soil.
Use a light, well-draining potting mix—avoid garden soil. Common mistake: heavy soil that compacts. Correction: mix in perlite or coarse sand (about 10–20%) to improve drainage.
-
Plan your herbs and spacing.
Group herbs with similar light and water needs. Example layout for a 24 in box: basil (center back), parsley and chives (middle), thyme or oregano (front edges). Common mistake: overcrowding. Correction: allow 4–8 in between plants depending on mature size; thin if necessary.
-
Planting technique.
Firm the soil lightly around roots, plant at the same depth as nursery pots, and water to settle the soil. Common mistake: burying stems too deep or leaving air pockets. Correction: tamp soil gently and water slowly until evenly moist.
-
Watering routine.
Water when the top 1 in of soil feels dry. Use a narrow-spout watering can to avoid wetting leaves. Common mistake: fixed schedule regardless of conditions. Correction: check moisture with your finger and adjust frequency seasonally.
-
Feeding and pruning.
Fertilize lightly every 4–6 weeks with a balanced, diluted fertilizer. Pinch back tips to encourage bushiness and remove flower buds if you want leaves. Common mistake: overfertilizing causing leggy growth. Correction: use half-strength feed and more frequent pruning.
Variations
-
Self-watering box.
Add a reservoir beneath a false bottom so plants draw water up through wicking. Good for people away for short periods; reduce overwatering mistakes.
-
Vertical or pocket planter.
Mount a shallow pocket planter on the wall beside the window to increase capacity. Choose herbs with small root systems like thyme, mint (contain mint to a pot), and chives.
-
Themed boxes.
Create an Italian box (basil, oregano, parsley), a tea/herb box (lemon balm, mint, chamomile), or a salad flavor box (chives, tarragon, dill).
-
Recycled containers.
Use old wooden crates, galvanized tray, or ceramic dishes with added drainage. Line wooden boxes with breathable cloth to extend life.
Troubleshooting and quick fixes
-
Yellowing leaves.
Often a sign of overwatering or poor drainage. Correct by improving drainage, allowing soil to dry partially, and removing affected leaves.
-
Leggy or pale plants.
Usually insufficient light. Move to a brighter window, rotate plants, or provide supplemental grow light for 6–8 hours daily.
-
Brown crispy edges.
Possible underwatering or dry indoor air. Increase watering slightly and mist occasionally, but avoid wetting foliage too often to prevent disease.
-
Pests (aphids, spider mites).
Inspect leaves regularly. Wipe pests off with soapy water spray and isolate an infested plant. Increase air circulation and remove heavily infested foliage.
-
Soil compaction or poor growth after several months.
Refresh the top 1–2 in of soil and repot into a slightly larger container if roots are crowded. Replace soil every year to renew nutrients.
Keeping a small herb box is mostly about observation: check light, sniff the soil, and prune regularly. With a modest setup, a few corrective steps, and small variations you can enjoy fresh herbs year-round without fuss.